JUnit 5 모듈 구성
JUnit5 모듈은 아래 세가지로 구성된다.
- JUnit Platform
- 테스팅 프레임워크를 구동하기 위한 launcher와 test engine을 위한 API 제공
- JUnit Jupiter
- JUnit 5를 위한 테스트 API와 실행 엔진을 제공
- JUnit Vintage
- JUnit3과 4로 작성된 테스트를 JUnit5 platform에서 실행하기 위한 모듈 제공
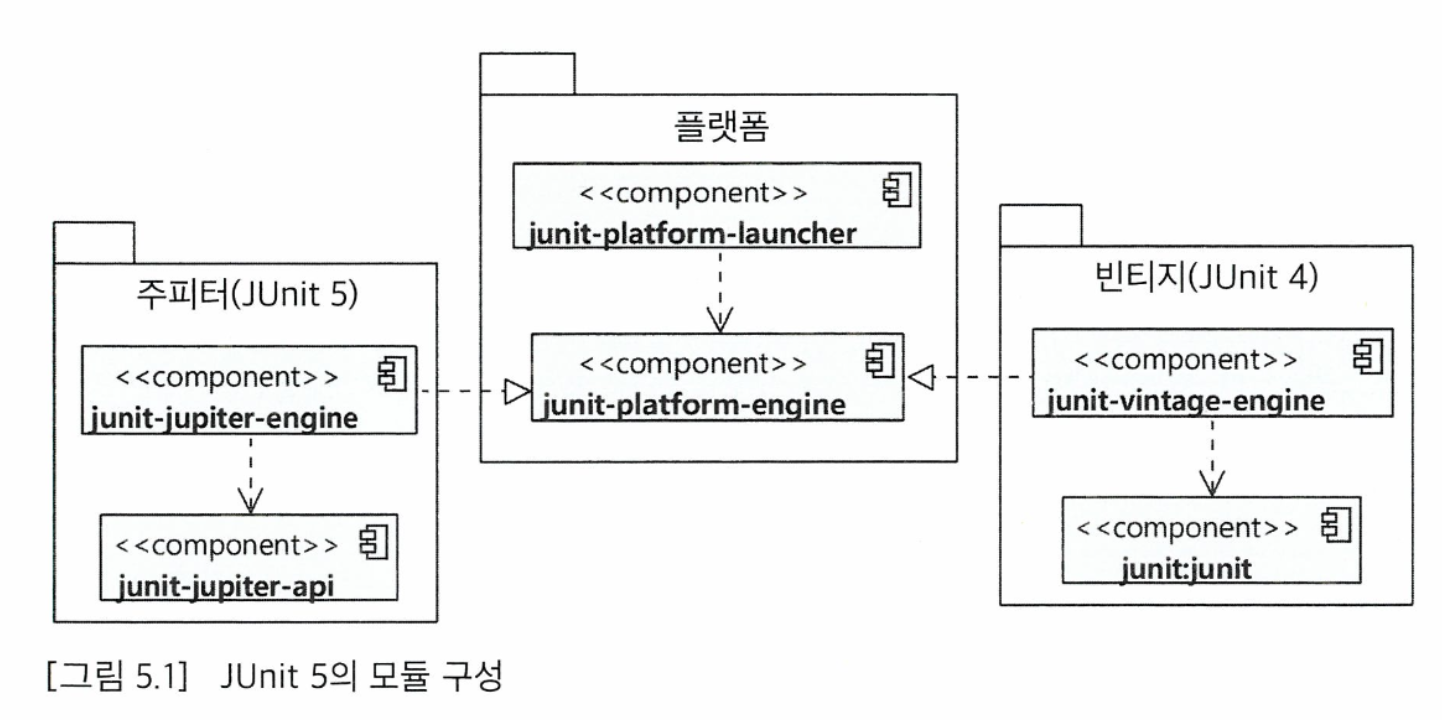
gradle의 test 관련 설정에서 JUnit5의 platform과 jupiter에 대해 살펴볼 수 있다.
plugins {
    id 'java'
}

group = 'org.example'
version = '1.0-SNAPSHOT'

repositories {
    mavenCentral()
}

dependencies {
    testImplementation platform('org.junit:junit-bom:5.9.1')
    testImplementation 'org.junit.jupiter:junit-jupiter'
}

test {
    useJUnitPlatform()
}
@Test 애노테이션과 테스트 메서드
@Test 어노테이션을 테스트 메서드에 붙이면 JUnit모듈을 통해 테스트를 실행할 수 있다.
(* JUnit은 테스트 메서드를 실행하기 위해 리플렉션(Reflection)을 사용하며, 리플렉션은 private 메서드에
접근할 수 없기 때문에 @Test어노테이션을 붙인 메서드는 private이면 안된다. )
주요 단언(Assertions) 메서드
JUnit의 Assertions 클래스는 값을 검증하기 위한 목적의 다양한 정적 메서드를 제공한다.
assertEquals()
- 두 객체가 같은 값을 갖는지 비교
@Test
void sameObjectAssertEquals_Then_TestPassed() {
    LocalDate dateTime1 = LocalDate.now();
    LocalDate dateTime2 = LocalDate.now();

    assertEquals(dateTime1, dateTime2);
}
fail()
- 테스트에 실패했음을 알리고 싶을 때 사용
- 정상적인 흐름으로 동작하지 않음을 검사할 수 있다.
@Test
void failMethodCalled_Then_TestFailed() {
    boolean throwException = false;

    try {
        this.throwIndeedException(throwException);
        fail(); // 이 지점에 다 다르면 fail() 메서드는 테스트 실패 에러를 발생
    } catch (Exception e) {
        return;
    }
}
assertThrows()
- 지정한 exception이 발생하는지 검사
@Test
void rightExceptionByAssertThrows_Then_TestPassed() {
    assertThrows(IllegalArgumentException.class, () -> {
        this.throwIndeedException(true);
    });
}
assertAll()
- assert 메서드가 실패하면 다음 코드를 실행하지 않고 바로 exception이 발생한다.
@Test
void beforeAssertionsFailed_Then_NextAssertionsNotCalled() {
    assertEquals(1, 2); // 검증 실패로 에러 발생
    assertEquals(1, 1); // 이 코드는 실행되지 않음
}
- 위 경우와 반대로 모든 검증을 실행하고 그중에 실패한 것이 있는지 확인하고 싶을 때 assertAll() 사용
@Test
void assertAllHasFailedCase_Then_AllExecute() {
    assertAll(
            () -> assertEquals(1, 2),
            () -> assertEquals(1, 1),
            () -> assertEquals(3, 4),
            () -> assertEquals(4, 4)
    );
}
테스트 라이프 사이클
아래 코드의 출력결과를 통해 테스트의 life cycle에 대해서 확인해보자.
public class LifeCycleTest {
    public LifeCycleTest() {
        System.out.println("call LifeCycleTest constructor");
    }

    @BeforeAll
    static void init() {
        System.out.println("call @BeforeAll method");
    }

    @BeforeEach
    void setup() {
        System.out.println("call @BeforeEach method");
    }

    @AfterAll
    static void cleanup() {
        System.out.println("call @AfterAll method");
    }

    @AfterEach
    void teardown() {
        System.out.println("call @AfterEach method");
    }

    @Test
    void a() {
        System.out.println("call @Test method a");
    }

    @Test
    void b() {
        System.out.println("call @Test method b");
    }
}
[출력 결과]
call @BeforeAll method

call LifeCycleTest constructor
call @BeforeEach method
call @Test method a
call @AfterEach method

call LifeCycleTest constructor
call @BeforeEach method
call @Test method b
call @AfterEach method

call @AfterAll method
출력 결과를 통해 테스트의 기본적인 life cycle에 대해서 확인해볼 수 있다.
- @BeforeAll 어노테이션 메서드 실행
- @BeforeAll: 테스트 클래스의 모든 테스트 메서드를 실행하기 전에 한 번 실행된다.
- 테스트 클래스 인스턴스 생성
- 테스트 메서드마다 독립적인 환경을 보장하기 위해, 테스트 메서드를 실행하기전에 테스트 클래스를 초기화한다.
- @BeforeEach 어노테이션 메서드 실행
- @BeforeEach: 각 테스트 메서드가 호출되기 전에 실행된다.
- @Test 메서드 실행
- @AfterEach 어노테이션 메서드 실행
- @AfterEach: 각 테스트 메서드가 종료된 후에 실행된다.
- @AfterAll 어노테이션 메서드 실행 (테스트 클래스의 모든 테스트 메서드가 호출되었다고 가정)
- @AfterAll: 테스트 클래스의 모든 테스트 메서드가 실행된 후에 실행된다.
테스트 메서드 간 실행 순서 의존과 필드 공유하지 않기
아래 테스트 코드를 살펴보면 FileOperator타입의 변수 op를 각 테스트 메서드에서 공유하고 있다.
메서드의 실행순서를 지정하지 않는다면, readFileTest가 먼저 실행될 수 있고, 제대로된 테스트가 수행되지 않게 된다.
또한 각 테스트 메서드는 독립적으로 실행되어야 하기 때문에 아래 코드처럼 상태(필드)를 테스트 메서드끼리 공유하는건 옳지 않다.
public class BadTest {
    private FileOperator op = new FileOperator();
    private static File file;

    @Test
    void fileCreationTest() {
        File createdFile = op.createFile();
        assertTrue(createdFile.length() > 0);
        this.file = createdFile;
    }

    @Test
    void readFileTest() {
        long data = op.readDate(file);
        assertTrue(data > 0);
    }
}
'Spring > 테스트' 카테고리의 다른 글
| [테스트 주도 개발 시작하기] 부록C. Mockito 기초 사용법 (0) | 2024.09.09 |
|---|---|
| [테스트 주도 개발 시작하기] Chap04 TDD-기능 명세-설계 (0) | 2024.09.01 |
| [테스트 주도 개발 시작하기] Chap03 테스트 코드 작성 순서 (1) | 2024.09.01 |
| [테스트 주도 개발 시작하기] Chap02 TDD (0) | 2024.08.29 |
